top of page

Our Experience Backpacking in North Cascades National Park

48°49′58″N 121°20′51″W

Two backpackers standing next to a dirt trail

LEARN MORE ABOUT OUR OWN EXPERIENCE BACKPACKING FOR 3 DAYS IN THE RUGGED BACKCOUNTRY OF NORTH CASCADES NATIONAL PARK.


We knew that a backpacking trip into the rugged wilderness of North Cascades National Park was a must-do - especially when we planned on visiting during a long weekend late in the summer (aka a prime time in the park).


While we showed up to the ranger station without really a plan - most of our ideas got kiboshed when we saw how much smoke there was from nearby forest fires - in the end, we ended up reserving two epic wilderness zone backcountry camping permits and planning one beautiful 3-day adventure.


Below is a breakdown of our own experience backpacking in North Cascades National Park - home to the greatest number of glaciers in the lower 48 states, some of the highest numbers of plant species in the whole USA park system, and just some truly magical hiking trails.


GETTING YOUR BACKCOUNTRY PERMIT FOR NORTH CASCADES NATIONAL PARK


One of the most important things to know about backpacking in North Cascades National Park is that you will need a backcountry permit for every night you are planning to spend in the backcountry.


There are two ways to get a backcountry permit: with an advanced reservation or by walking up the day before or the day of your trip. The main difference here is that the advanced reservation can be made up to two days before your trip, whereas the walk-up reservations are only available the day before or the day of your trip's start date.


Whichever way you do it, you will need to stop by the Wilderness Information Center to pick up your permit in person. The Wilderness Information Center is located in the town of Marblemount, which is approximately 7.5 miles from the west entrance to the national park.


📌 EXACT ADDRESS: 7280 Ranger Station Rd, Marblemount, WA 98267

🕝 HOURS: 7 AM - 4 PM, 7 days a week


➳ Learn more about North Cascades National Park Backcountry Permits here.


OUR 3 DAY BACKPACKING ADVENTURE IN NORTH CASCADES NATIONAL PARK


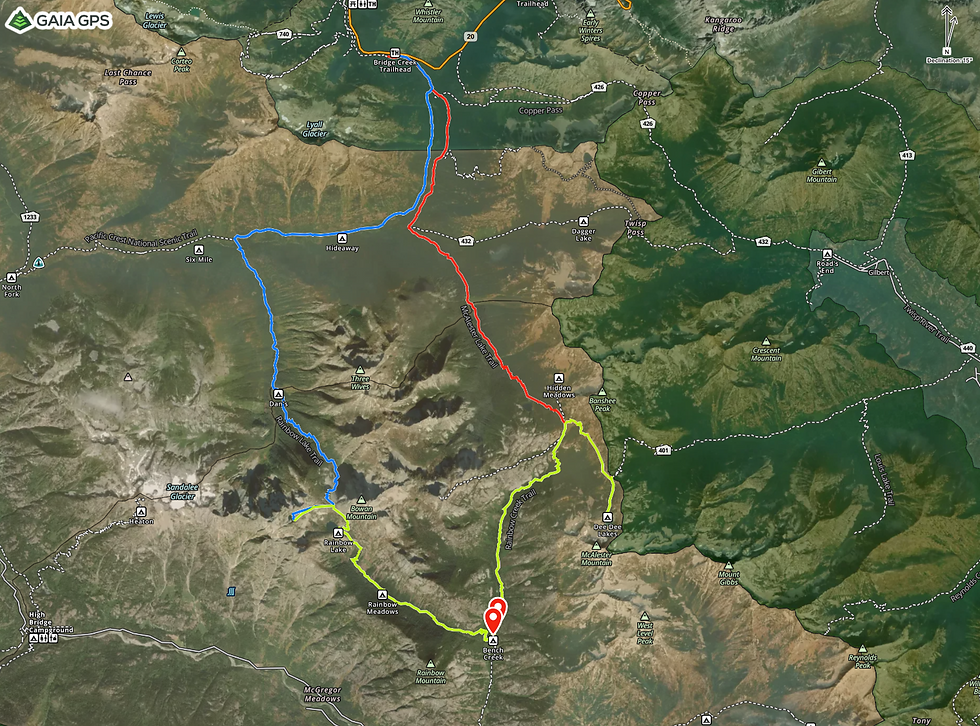
After talking to a ranger at the Wilderness Information Center we decided to head out on a backpacking route that started at the Bridge Creek Trailhead and then looped around the mountains and over Rainbow Pass and McAlester Pass before ending at the same trailhead.


Along this 30+ mile route we were able to get two wilderness backcountry camping permits - meaning we weren't going to be camping in an established camping area, but instead we would just have to hike into the specific wilderness zones and we could camp anywhere there (obviously within reason, always follow all Leave No Trace Principles when backcountry camping).


Below is a breakdown of our 3-day backpacking adventure in North Cascades National Park.


OUR BACKPACKING ROUTE


DAY 1


| Mileage: 14 miles / 22.5 kilometers

| Elevation Change: ~ 4,000 feet of gain, ~2,000 feet of loss (1,218 meters up, 620 meters down)

| Time on Trail: ~9 hours

| Bridge Creek Trailhead --> Rainbow Pass (Gaia GPS Route)


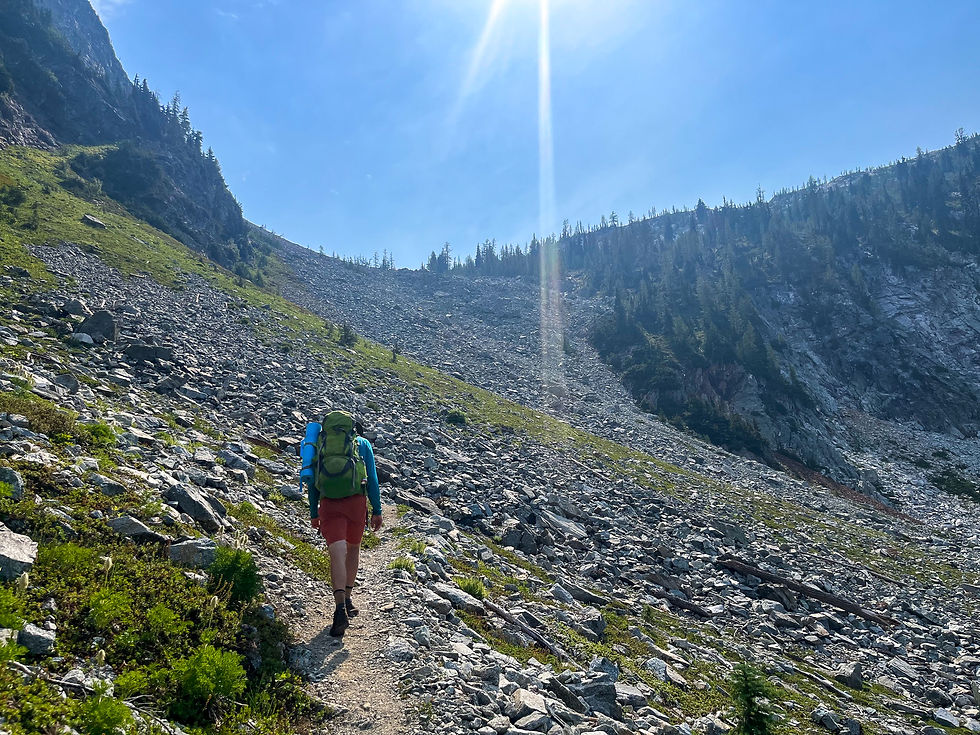
Our backpacking adventure started out by going south on the PCT. Within the first 15 minutes of hiking we actually saw a bear (we would see two during the whole 3 day trip). The first couple of miles were mostly downhill and along a pretty thick trail (there were bushes and berries thick on both sides). Along the PCT section of the loop the way, we passed the Fireweed, Hideaway, and South Fork Campgrounds (the latter two had bathrooms available which was nice).


Like most trails in North Cascades National Park, water was easily available for filtering as the trail crossed many rivers and streams (meaning you likely won't have to pack much water with you). We had our first snack break and refilled our two water bladders at the South Fork Campground. Obviously, while water is usually easily available, make sure to always check your map to see how far you have distance-wise between water refill stations.


Once across Bridge Creek, we left the PCT behind and started hiking up the Rainbow Creek Trail (the PCT does continue south towards Stehekin - which is roughly 18 miles from the Bridge Creek Trailhead).


Rainbow Creek Trail - though a bit less traveled than the PCT - was still quite nice. The trail crossed multiple meadows and pass through numerous pine forests. In truth, we really didn’t see anyone until we got just below Rainbow Pass - which was at least 3 miles from the turn-off.


💬 INSIDER TIP: due to the national park's high number of bears (mostly black bears) it is important to always stay bear-aware while hiking. Learn more about this in our handy Bear Safety article.


Along the trail, there are usually (depending on the season of course) a lot of wild berries growing, including, blackberries, blueberries and thimbleberries (which are a light pink or red color and taste kind of like a strawberry). We suggest slowing down and spending a bit of time eating these berries (or adding them to your oatmeal in the morning like we did). They are seriously 100x better than any store bought berry.


Soon enough we passed Dan’s Camp (where there is a bathroom you can use) and then started the long uphill climb that culminated with crossing Rainbow Pass (elevation: 6,238 feet). Towards the base of the final push to the top of the pass, we took another snack break and refilled our water bladders in a small stream.


When backpacking, it is important to know the signs of dehydration or low blood sugar (aka you need to take a quick snack break). These signs include feeling sluggish, hangry, lightheaded and a grumbling tummy. When we start to feel like a snack or water break is needed we usually reach for something with a good dose of sugar (like gummy candies) or something with a high level of salt/electrolytes (pickles are great).


The climb up to the top of Rainbow Pass ended up being pretty easy (there was a nice set of switchbacks that made the hike up feel pretty gradual overall). At the top of the pass, you will get some truly stunning views of the surrounding mountains; including the 7,000+ foot Bowan Mountain.


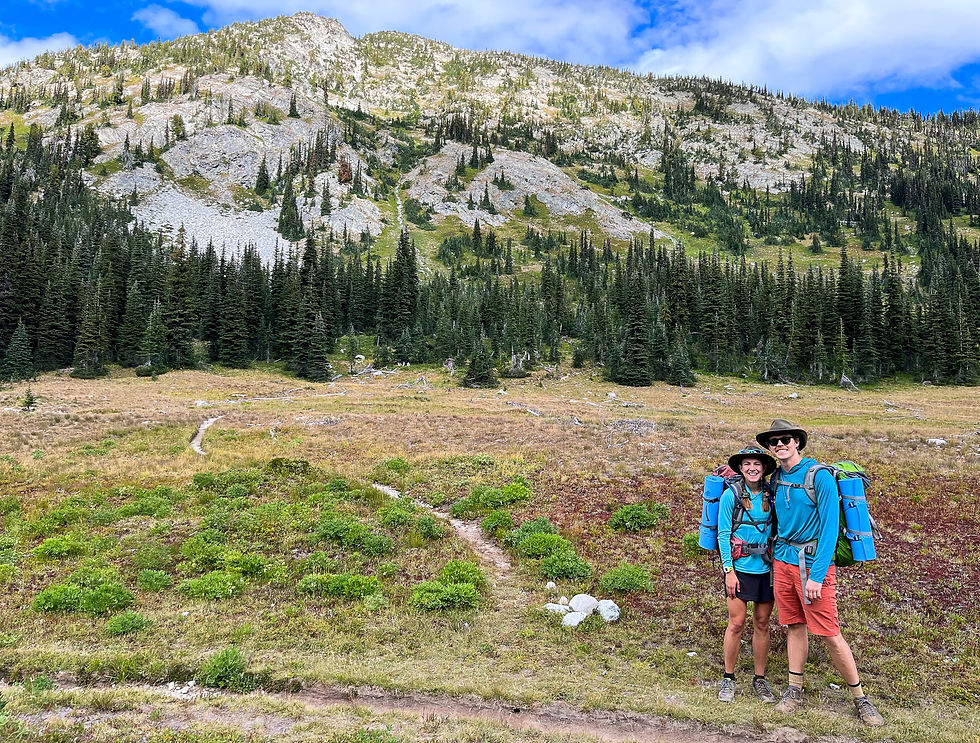
Once at the top, we turned right and left the main trail behind. This was because from Rainbow Pass it was relatively easy to hike out into the McGregor Wilderness, which is where our Night 1 camping permit was for. The wilderness area included multiple mountain lakes - including an unnamed one that we ended up camping along.


We set up camp near the bank of the rather large unnamed lake and promptly jumped in to cool off and scrub off some of the dirt and ash (our first day on the trail was rather smoky). Then we started making a delicious dinner of teriyaki noodles with Thai chili tuna and some instant mashed potatoes (not combined). Once done eating, we made sure to leave all of our smelly cooking stuff and our packed bear box quite a distance from our tent (a key bear-safe practice).


Once the sun went down behind the mountains we pretty much headed straight to bed. We don't know if it was because of the long day on the trail or because of the whole camping paradox of getting in tune with the sun, but once it got totally dark out we were suddenly really tired and soon enough we were fast asleep.


Backpacker going up Rainbow Pass in North Cascades NP


Wide view of a forested ridge in the sunset-lit mountains


DAY 2


| Mileage: ~14.5 miles / 23 kilometers

| Elevation Change: 3,854 feet gained, 4,032 feet lost (1,775 meters up, 1,229 meters down)

| Time on Trail: ~10.5 hours

| Rainbow Pass --> South Pass (Gaia GPS Route)


We woke up pretty early on the second day, even though the sun didn't hit our tent until much later than expected due to Bowan Mountain blocking the rays of the rising sun.


Once up, we started boiling water for oatmeal and instant coffee. Then we filtered water from the lake, packed up our stuff and started making our way back out to the main Rainbow Lake Trail. Though it took us a bit longer to make it back to the established trail, we were pleasantly surprised to find that much of the smoke had dissipated from the day before and we could now see Lake Chelan down in one of the valleys to the south.


Starting from the top of Rainbow Pass, it took us about 45 minutes to hike down to Rainbow Lake where we took a quick break to make some more coffee and go for a quick swim (it was already starting to warm up). From Rainbow Lake it is about 4.5 miles to the next major water refill station of Bench Creek, so we made sure to fill both of our water bladders and also chug a lot of water before setting off down the trail.


Between Rainbow Lake and Bench Creek you do lose a lot of elevation - especially during the switchback section right after the lake. While the Alltrails route suggests going clockwise, we instead think going counterclockwise is a little less challenging mainly because of this section (though you do end up climbing another set of switchbacks later in the day, but we'll get to that in a second). If you decide to follow our counterclockwise route, we suggest taking your time on these switchbacks as they are a bit rocky and can get slippery - especially after any rain or snow.


Along this section of the trail - which is almost entirely downhill or flat - you will pass three backcountry camping areas for Rainbow Meadows (one of them is a stock site). And then once you get to the river you will see Bench Creek, another campsite. From what we remember, there was at least one bathroom available in the Rainbow Meadows camping area.


Once you cross Bench Creek, where you can easily filter water and find some shade for lunch, you will start the climb up to the top of McAlester Pass along the Rainbow Creek Trail. For the most part, the trail up to the pass is pretty chill until you get to Bowan Camp, which is roughly 1.5 miles up the trail (in total, you climb just over 700 feet during that section).


At Bowan you can use the bathroom and take a break before the real climbing begins. From the camp - which is pretty small and nondescript - you will hike up just under 3 miles and gain 1,614 feet of elevation gain to reach the top of McAlester Pass (elevation: 6,004 feet). Most of that elevation gain comes near the end when you begin a fun hike up 22 switchbacks (luckily they are all pretty short). From the top of the switchbacks you have amazing views of the surrounding peaks; including, Rainbow Ridge, South Pass Peak, Dee Dee Peak and McAlester Mountain.


You will know you have reached McAlester Pass when you enter a large open mountain meadow. From the meadow you have the option to hike down to McAlester Lake (where there is a campground), or stay up near the pass at High Camp.


We decided to instead hike another 1.4 miles to the top of South Pass, which is located off to the right of the meadow on a nice, established trail and spend the night there (after making a quick trip to the stunning Dee Dee Lakes for dinner). South Pass gives you great views of the surrounding peaks - though there are no amenities (it is another wilderness zone camp) so make sure to come prepared with everything you would need (including a bear box).


Wide view of mountains and forests under a stormy sky


💬 INSIDER TIP: we were allowed to camp up and away from the main campgrounds once again because we got a permit specifically for that area at the Wilderness Information Center. If you are confident in your backcountry skills and know how to follow all Leave No Trace Principles, then we recommend trying to get one of those specific campsites yourself.


Once camp was set up and dinner was made (another round of tasty mushroom pasta with a side of instant mashed potatoes and tuna), we packed away all of our smelly stuff into the bear box and stored it nice and far from the tent (we had already seen one bear on the trail up to the pass).


Day 2 on the trail was a bit longer than Day 1 - though it didn't necessarily feel harder(even though there was a bit more elevation gain overall). Maybe it was because we started out by losing a lot of elevation during the hottest part of the day and then gaining it all back once clouds began to roll in (we luckily missed most of the rain), or maybe it was because we were a bit more hydrated overall. Either way, we both really enjoyed the second day on the trail as it gave us numerous chances to see wildlife and flowers as well as a lot of awesome viewpoints.


Clear turquoise alpine lake in North Cascades National Park


DAY 3


| Mileage: 9.9 kilometers / 16 kilometers

| Elevation Change: 1,391 feet gained, 3,077 feet lost (424 meters up, 938 meters down)

| Time on Trail: ~5 hours

| South Pass --> Bridge Creek Trailhead (Gaia GPS Route)


We got a pretty late start on our third morning. After a relatively quiet night, we decided to get up nice and early to watch the sunrise over the nearby mountains. Just after dawn broke we crawled out of our sleeping bags, pulled on our warmest layers and started boiling water. That morning we were in for a real treat as we had picked about a cup's worth of wild blueberries along the hike the day before. While instant oatmeal is pretty okay by itself, it really is something special once you add delicious wild blueberries to it.


Once food and coffee were made we walked up to a little overlook and waited for the sky to start changing colors. For the next hour or so we just marveled at the quickly lightening landscape - the sky went from a pale peach to a vibrant orange and then back to a calming blue. Soon enough we were full, caffeinated and a little sore from sitting on the rocks. So we made our way back to camp, packed up everything and then very slowly started hiking back to the main Rainbow Creek Trail (we probably ate another cup's worth of wild blueberries each along this 1.5 mile section of trail).


By the time we made it back to the sign for McAlester Pass the sun was high in the sky and we were ready to get moving down the trail. We ended up packing just enough food for the last day on the trail: by the time we got about halfway back to the beginning of the loop we ate the last of our tuna and tortillas. Now all that was left in our packs were a couple of victory gummy candies.


The 3rd day on the trail was overall pretty chill. The trail was mostly downhill and along a river - meaning we could fill up whenever necessary and not worry about running out of water. Plus, for the most part, the whole trail was in the forest so the sun never felt too intense.


Near the end of the loop we decided to take a spur trail back to the start instead of hiking back on the PCT (which we had hiked in on). The spur trail (known as the Stiletto Spur Trail) ran parallel to the main PCT trail and was much quieter and a bit more rugged (aka overgrown). Along this part of the hike we found numerous blackberry and thimbleberry bushes, which of course we took full advantage of.


Soon enough we popped back onto the PCT and hiked the last mile or so through the thick pine forest until we started hearing the sounds of the highway. About 30 minutes later we were back at the van, a bit tired and very much ready for some chips and salsa and mac and cheese.


Day 3 was by far the easiest day of the whole backpacking adventure. We made sure that our final day on the trail would be the shortest, as we didn't want to stress about getting back to the trailhead late in the day (we had obligations the next day we couldn't miss).


When planning your own backpacking trip we recommend organizing it similarly, as this set-up allows for some wiggle room during your previous days on the trail (i.e. you might have been over gumptious in planning and you end up not making it to the campsite you had originally hoped to reach the night before). Plus, it is just nice to know that your last day (the final stretch) will likely be nice and easy.


Wide view of sunny mountains and forests in Washington


Overall, we would say this Rainbow Pass - McAlester Pass Loop is a great way to get into the rugged backcountry that makes North Cascades National Park so famous. The loop is pretty straightforward and really easy to follow (signage along the trail was top-notch). Plus, there was plenty of water available to filter from, meaning you can really decrease your pack weight by only carrying a couple of water bottles and a water filter (like this one).


Throughout the three days we couldn't stop marveling at the mountainous landscape - especially on days 2 and 3 when the smoke cleared and the whole landscape came into sharper focus. Plus, the flowers and wild blueberries really lit up the whole trail - especially near the top of the passes. If you are looking for a fun 3-day backpacking adventure then we cannot recommend the Rainbow Pass - McAlester Pass Loop enough.


► Check out our adventure film on the whole trail for a better idea of what we mean.


\\ Our Backpacking Tips


Below are a few backpacking tricks and tips we have learned over the years:


| Consider bringing a nicer breakfast to eat on the first day of your backpacking adventure. We usually go with nice, hearty pancakes with lots of stuff mixed in (nuts, fruit, chocolate, etc.). We then pack them in a large Ziploc bag and eat them along the trail. By the end we are stuffed, happy and now have a handy plastic bag to store stuff in (like trash we find and pick up along the trail).


| Similarly, think about bringing some food with you on the first day of the trail that will “spoil”. What we mean is on your first day of backpacking pack something to eat that is a bit nicer than just tortillas and tuna (our go-to backpacking lunch). For example, we brought a packet of crackers and cheese and some plums to eat for lunch on Day 1. All three of those things won't last for long on the trail, so we made sure to eat all of it by the end of the day. This once again allows you a bit of luxury along the trail (plus cheese and crackers taste better out in nature).


| Another handy tip we have learned is to have a specific towel just for when you rinse your face. This is definitely not a necessity, but for us there are few things nicer than finishing a hard (sweaty) day on the trail and rinsing off all of the dirt and grime in an ice cold alpine lake. We enjoy having a specific towel for our face (a small reusable paper towel - like this one - works great) just so we don't have to worry about cross-contamination (this sounds so bougie we know).


| The final backpacking tip we have learned is to always have a couple of different maps on you. In the case of this backcountry adventure in North Cascades National Park, we packed a large paper map from Green Trails (find it here), the small national park wilderness map (which had information on campsite locations) and then also two electronic maps: one on Gaia GPS on Luke's phone and the second on Alltrails on Madalyne's phone. While this might seem like overkill - especially when the trails are so well-marked, it is more for peace of mind than anything else. Plus, then we can mark specific points of interest that we can go back to and look at later (like when we are writing these adventure trip guides).


\\ What We Brought With Us on the Trail


Below is a basic outline of what we packed with us on our 3-day backpacking adventure. You can learn more about what we packed in our super handy backpacking planning guide.


FOOD


BREAKFAST

| Oatmeal packets (we usually go with a variety pack)

| Individual instant coffee

| Wild blueberries (picked fresh near our camps)

| Pancakes (delicious and nutritious)


LUNCH & SNACKS

| Tortillas (the larger flour ones work best)

| Various flavored tuna packets

| Pickles

| Gummy candy

| Granola bars

| Crackers (for Day 1)

| Brie (for Day 1)

| Baked goods (mainly day olds from a local bakery)

| Mandarin oranges


DINNER

| Instant mashed potatoes (we like the family-sized ones)

| Instant noodles (there are many flavors available, we like the Knorr brand)

| Flavored tuna packets


GEAR

We did not pack very light for this trip. In fact, we packed a lot of our heavier-duty/winter kind of gear just because that is what we had in the van. Even though our bags were a bit heavier than we would have originally liked, it wasn’t too, too terrible. Below is everything we had stuffed into our two backpacking bags:


SLEEPING

| 2 person/4 season tent

| 2-person sleeping bag (great for conserving energy)

| Light down blanket (great if it packs down easily)

| 2 mediocre sleeping pads (this was our weakest link)


COOKING & EATING

| Jetboil stove and pot

| Green propane bottle (1 full bottle should be enough for 3 days in the backcountry)

| Plastic bowls for food

| Set of camping silverware

| Katadyn water filter

| Camelbak water bladders (2, each 5 liters)

| Bear box (this is a must when backpacking in the area)


CLOTHING

Besides the regular set of hiking clothes we usually wear, we also made sure to pack...


| A rain jacket (this is Washington after all)

| A puffy jacket (especially nice if it packs down really tight)

| Lightweight winter hat

| Extra pair of tights/warm pants to wear at camp

| Extra pair of socks to wear around camp

| Sandals/another set of comfortable shoes to wear at camp

| A quick drying towel (we like this one from Packtowl)


EXTRA

| Sunscreen

| Bug spray (the mosquitos can be fierce at night)

| Fabric face wipe

| Headlamps (at least two, we like this one from Petzl)

| Extra headlamp batteries

| Hand sanitizer

| Ibuprofen

| Band-Aids/First-Aid Kit

| Bear spray (black bears are quite common in North Cascades National Park)


All of these things could easily be packed into our two Deuter backpacking bags (like this one). Though we did end up having to strap our sleeping pads on the outside, which was totally fine. At the start of our hike we would say our bags weighed between 20 - 35 pounds which is a bit heavier than most people would probably like.


Backpacker standing near tent in the backcountry


If you are looking for a fun and beautiful adventure in North Cascades National Park, then we cannot recommend spending a couple of days in the backcountry hiking and camping enough. Backpacking in this national park - which is known for its rugged wilderness and majestic peaks - is a great way to disconnect and get back to nature. Plus, the trail system and amenities are top-notch.


Hopefully, reading about our own experience helps inspire you to get out there and explore for yourself. If you have any questions about backpacking in North Cascades National Park - or just backpacking in general - please leave a comment or question below or reach out to us directly!


Happy adventuring!


WANT TO SAVE THIS BACKPACKING ADVENTURE GUIDE FOR LATER? CONSIDER PINNING IT!


Pinterest pin on our experience backpacking in North Cascades National Park


EXPLORE EVEN MORE ADVENTURE GUIDES


bottom of page